使用 Github Actions 自动更新 ANNOVAR 的 Clinvar 数据库
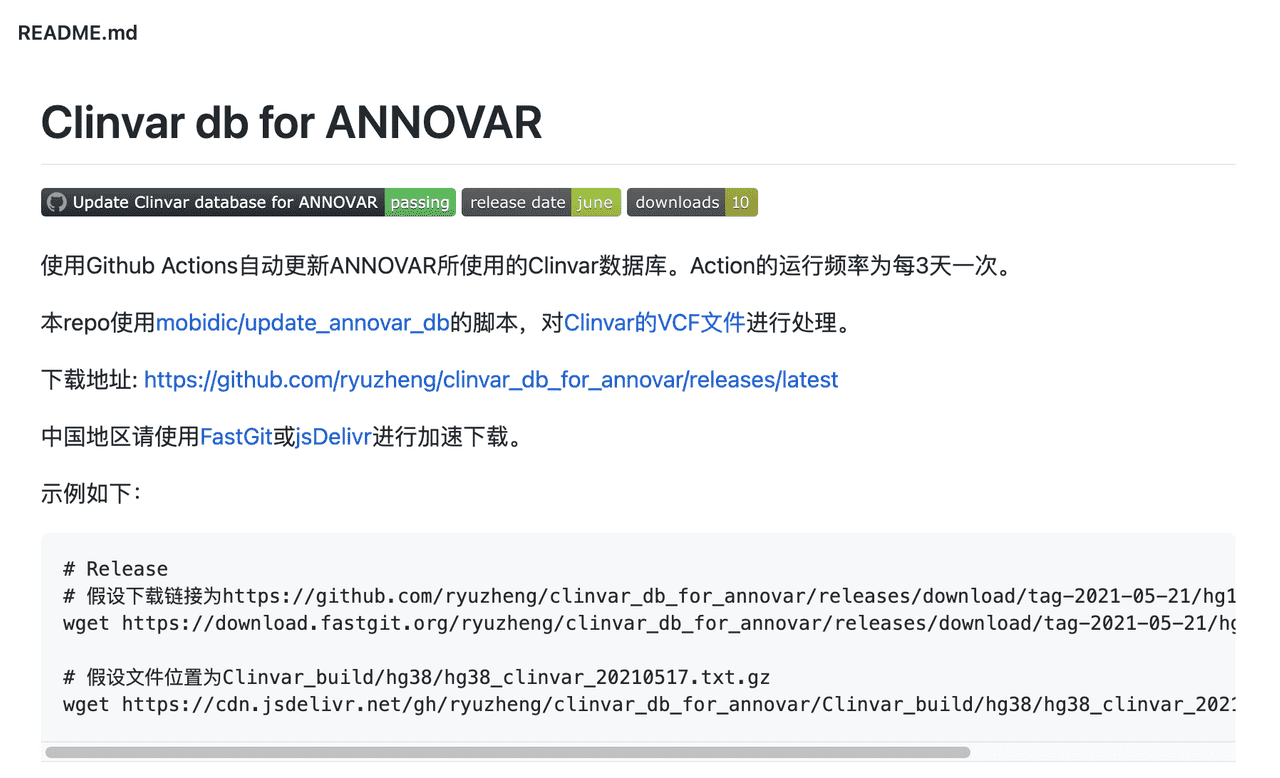
前段时间,看到ANNOVAR在文档里更新了一个可以自行更新Clinvar数据库的脚本,ANNOVAR更新Clinvar的频率,一般是半年到一年才更新一次。
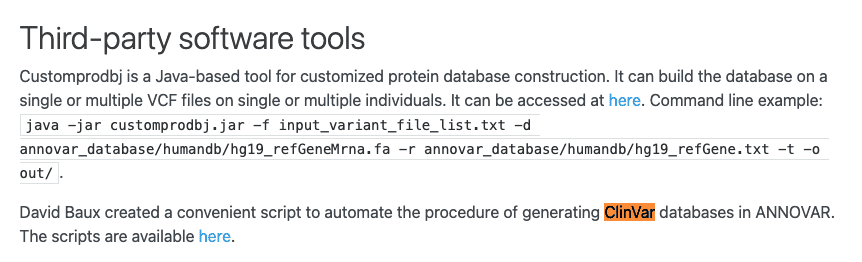
恰好又看到Github新推出了“Flat Data”,就想着是不是能够像Flat Data一样,抓取Clinvar数据库,然后定期更新成ANNOVAR数据库;可惜研究了一圈,Flat Data的示例都是使用JavaScript或者Typescript脚本的。 此路不通,那就换一条路,使用David Baux的脚本和Github Actions来实现以下目的: 1. 定时从NCBI抓取Clinvar的VCF更新(Github在国外,下载快); 2. 转换成ANNOVAR的数据库文件(省却下载到服务器再处理的步骤); 3. 发布到Github repo和打包成release,使用CDN加速下载
正好Clinvar的数据库压缩后的文件为15Mb左右,不会超过大小限制;其他ANNOVAR的数据库,也可以使用相同的实现方法。
建立Github repo
首先我们建立一个repo,如ryuzheng/clinvar_db_for_annovar,主要存放生成的Clinvar数据库文件、release和Github Actions脚本; 然后为了整洁,我另外建立2个repo,分别存放
-
需要用到的ANNOVAR脚本,如
ryuzheng/ANNOVAR_script,版权问题,设置为私有repo,请自行到ANNOVAR官网下载convert2annovar.plindex_annovar.pl
- 修改过的脚本,如ryuzheng/update_annovar_db,修改为下载weekly更新的VCF与其他一些更适合Github Actions的改动,这里不赘述
然后我们通过submodule,将这2个repo与原来的主repo连接起来,
# 进入主repo的文件夹
cd clinvar_db_for_annovar

# 注意这个repo是私有的,所以得用ssh的形式
git submodule add [email protected]:ryuzheng/ANNOVAR_script.git

# 这个repo是公开的,https和ssh的形式都可以
git submodule add https://github.com/ryuzheng/update_annovar_db.git、

# 后期如果更新了其中某个submodule的repo,需要更新链接的版本
git submodule update --remote
# 或者进入submodule的文件夹
cd update_annovar_db
git pull origin main
我们整个目录的结构如图

这样做的好处是,
- 主repo看起来很干净,只存放生成的文件,并且commit的记录也很干净;
- 后期如果需要更新代码,我们只需要单独修改submodule的链接,submodule项目的其他代码修改不会影响这个项目;
- 由于部分代码不能公开,submodule可以引入私有repo
编写Github Actions
我们在repo文件夹下建立.github/workflows文件夹,用来存放Github Actions的yml文件,Github会自动识别该文件夹下的yml文件。
在.github/workflows下新建一个update_clinvar.yml文件,内容如下:
name: Update Clinvar database for ANNOVAR # 设置该action的名称

on:
  schedule:
    - cron: "0 0 */3 * *" # 由于Clinvar一周更新一次,这里设置为每3天一次
workflow_dispatch: # 用于手动执行然后我们先建立第一个任务(jobs),将这个任务命名为build,运行我们修改后脚本,将clinvar的VCF文件转换成ANNOVAR的数据库,并上传结果到artifacts,用于下一步。
jobs:
  build:
    runs-on: ubuntu-latest
    strategy:
      matrix:
        genome: ["hg19", "hg38"] # 设置一个matrix,分别为hg19和hg38 2个基因组版本的任务

    steps:
      - uses: actions/checkout@v2
        with:
          token: ${{ secrets.GH_TOKEN }}
          submodules: "true"

      - name: Set up Python 3.9 # 使用python 3
        uses: actions/setup-python@v1
        with:
          python-version: 3.9

      - name: Install dependencies # 安装依赖
        run: |
          python -m pip install --upgrade pip
          pip install -r requirement.txt

      - name: Update Clinvar with GRCh37 # hg19的clinvar文件处理
        if: matrix.genome == 'hg19'
        run: |
          cd ./update_annovar_db
          python3 ./update_resources.py -d clinvar -w -hp ../Clinvar_build/hg19 -a ../ANNOVAR_script -g GRCh37

      - name: Update Clinvar with GRCh38 # hg38的clinvar文件处理
        if: matrix.genome == 'hg38'
        run: |
          cd ./update_annovar_db
          python3 ./update_resources.py -d clinvar -w -hp ../Clinvar_build/hg38 -a ../ANNOVAR_script -g GRCh38

      - name: Upload artifacts # 上一步生成地址为Clinvar_build/hg*,上传文件成artifact
        uses: actions/upload-artifact@v2
        with:
          name: ${{ matrix.genome }}
path: ./Clinvar_build/${{ matrix.genome }}然后我们建立第二个任务,将这个任务命名为release,用于当clinvar更新时,存放我们更新后的文件,以及打包成release发布。
  release:
    runs-on: ubuntu-latest
    needs: build # 需要上一步build执行成功后方能执行

    steps:
      - uses: actions/checkout@v2
        with:
          token: ${{ secrets.GH_TOKEN }}

      - name: clean previous build # 删除之前的版本
        run: |
          rm -f Clinvar_build/hg19/*
          rm -f Clinvar_build/hg38/*

      - name: Download artifacts for GRCh37 # 将hg19的artifact下载到指定路径
        uses: actions/download-artifact@v2
        with:
          name: "hg19"
          path: ./Clinvar_build/hg19

      - name: Download artifacts for GRCh38 # 将hg38的artifact下载到指定路径
        uses: actions/download-artifact@v2
        with:
          name: "hg38"
          path: ./Clinvar_build/hg38

      - name: Commit # 只有文件发生变动,才会commit
        id: auto-commit-action
        uses: stefanzweifel/git-auto-commit-action@v4

      - name: Push changes
        uses: ad-m/github-push-action@master
        with:
          github_token: ${{ secrets.GH_TOKEN }}
          branch: master

      - name: Get current date # 获取当前日期,作为release的版本
        id: date
        run: echo "::set-output name=date::$(date +'%Y-%m-%d')"

      - name: Create Github Release # 只有新的commit,才打包发布新版本
        if: steps.auto-commit-action.outputs.changes_detected == 'true'
        uses: actions/create-release@v1
        id: create_release
        with:
          tag_name: tag-${{ steps.date.outputs.date }}
          release_name: release-${{ steps.date.outputs.date }}
        env:
          GITHUB_TOKEN: ${{ secrets.GH_TOKEN }}

      - name: Upload assets to Github Release # 将生成文件上传到release的asset
        if: steps.auto-commit-action.outputs.changes_detected == 'true'
        uses: csexton/release-asset-action@v2
        with:
          pattern: "Clinvar_build/*/*.gz"
          github-token: ${{ secrets.GH_TOKEN }}
release-url: ${{ steps.create_release.outputs.upload_url }}完整的yml文件请查看update_clinvar.yml。
配置Github token
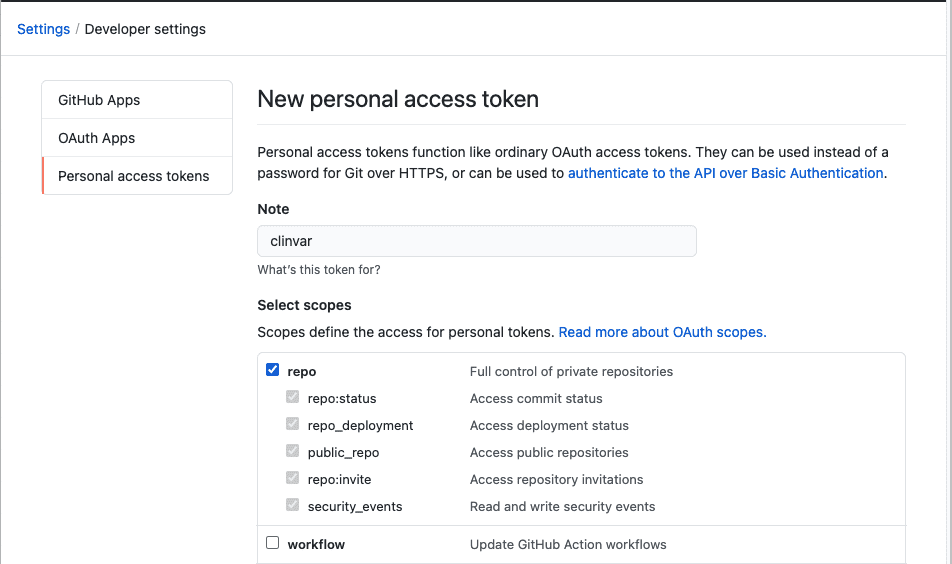
在上一步的yml文件里,相信大家多次看到类似github_token: ${{ secrets.GH_TOKEN }}这样的配置,这是因为Github在执行诸如commit、checkout、push等git操作时,都需要权限,因此我们需要配置一个token。而这个token,我们放在secrets里,别人是无法看到的。
打开Personal access tokens,点击右上角的Generate new token,输入一个名字用于识别,然后勾选上repo的框(允许repo的操作,视乎你所需的权限),然后点击Generate token,将生成的token复制好。
再打开你的repo的Settings选项卡,然后选择Secrets该项,点击右上角的New repository secret,填入名称,如GH_TOKEN,这个名称要与yml里的${{ secrets.GH_TOKEN }}相同,然后将刚才复制好的token填入下面的value里。
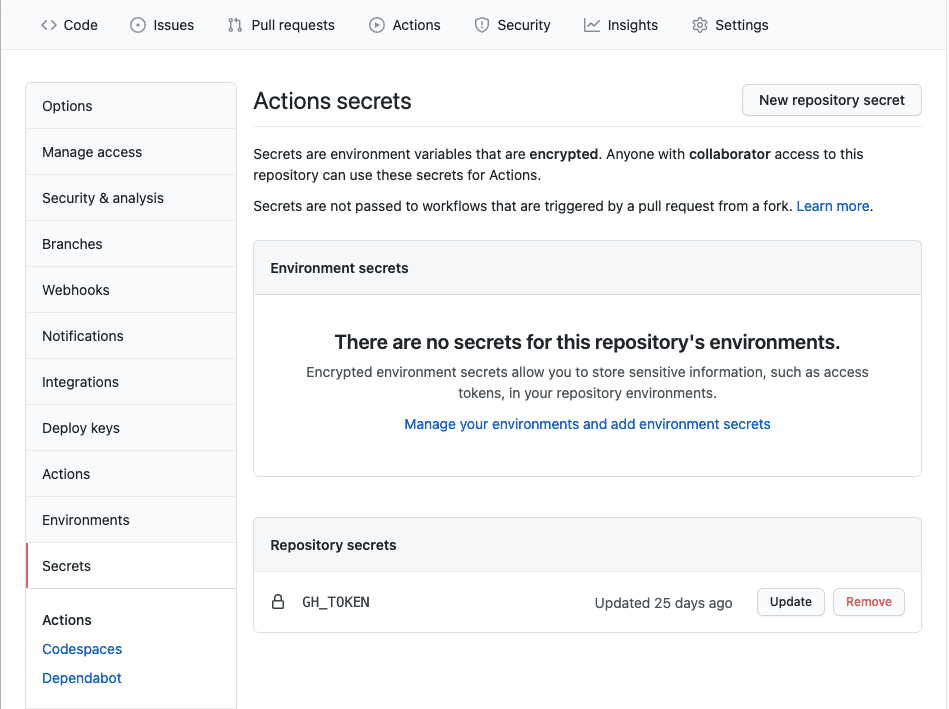
这样我们就配置好了token;如果大家有其他密钥或者需要保密的内容,也可以设置在secrets里。
运行Github Actions
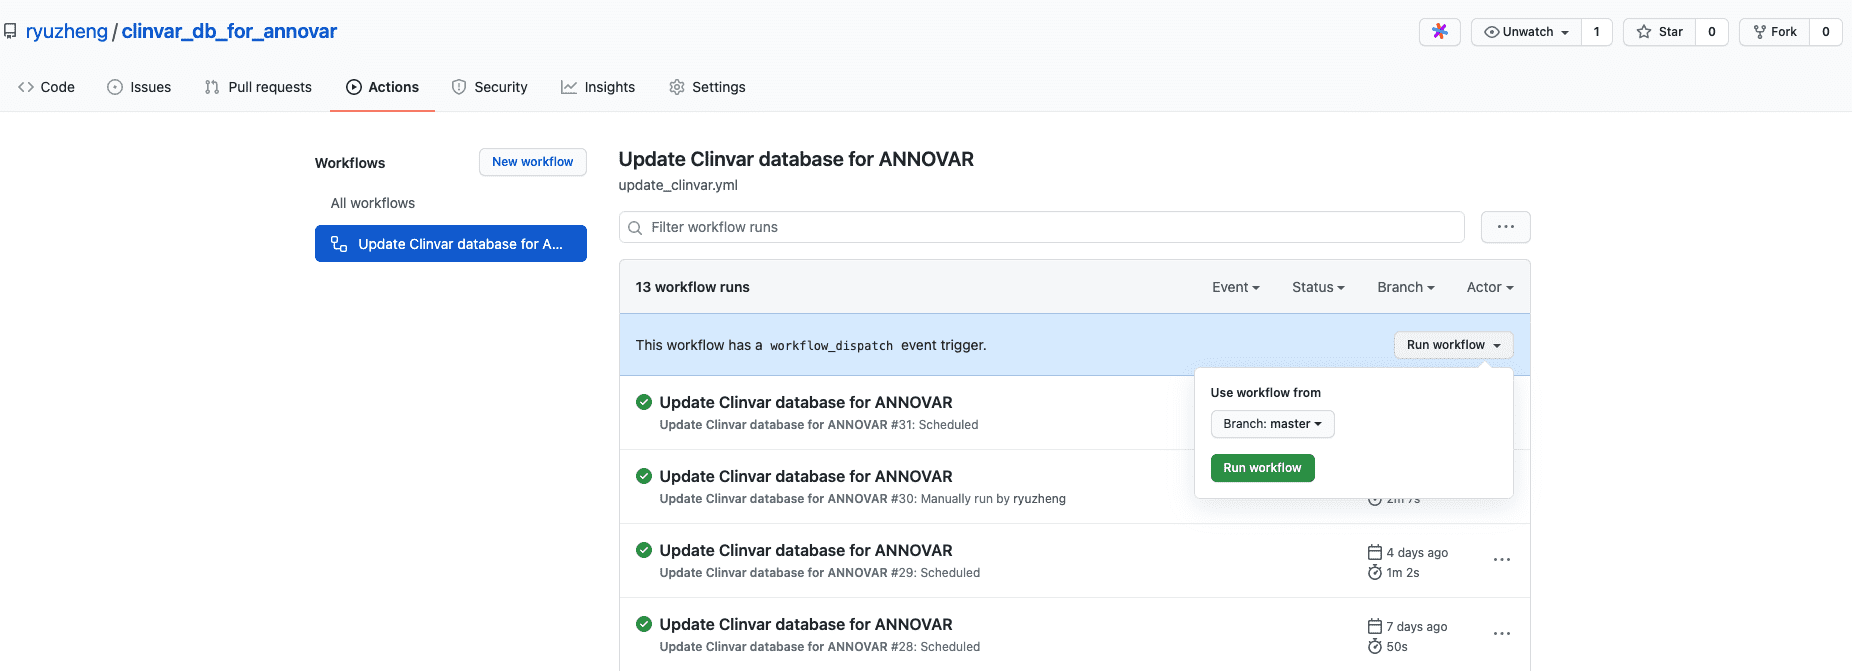
我们点击repo的Actions选项卡进入该repo的Actions,第一次进去,可能会提示Get started with GitHub Actions,我们点击“Skip this and set up a workflow yourself”就行。
然后我们在All workflows下会看到我们刚才命名为Update Clinvar database for ANNOVAR的action,点击进入,点击右边的run workflow就可以手动执行。
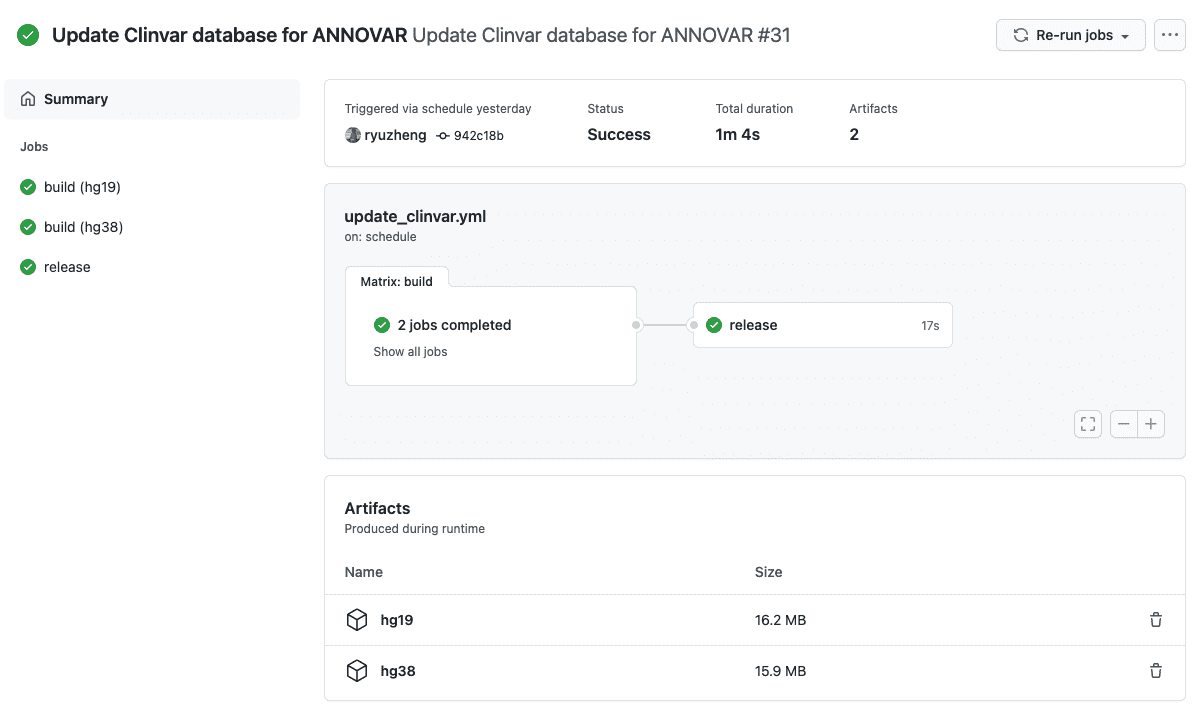
如果执行成功,我们可以看到不同的jobs运行结果以及生成的artifacts。
CDN加速下载
打开https://github.com/ryuzheng/clinvar_db_for_annovar/releases/latest,就能看到最新的release,我们可以FastGit或者jsDelivr来作为CDN,示例如下
# Release
# 假设下载链接为https://github.com/ryuzheng/clinvar_db_for_annovar/releases/download/tag-2021-05-21/hg19_clinvar_20210517.txt.gz
wget https://download.fastgit.org/ryuzheng/clinvar_db_for_annovar/releases/download/tag-2021-05-21/hg19_clinvar_20210517.txt.gz

# 假设文件位置为Clinvar_build/hg38/hg38_clinvar_20210517.txt.gz
wget https://cdn.jsdelivr.net/gh/ryuzheng/clinvar_db_for_annovar/Clinvar_build/hg38/hg38_clinvar_20210517.txt.gz
至此,我们的目的已经达成,如无意外,Github Actions会每3天去抓取Clinvar最新的VCF文件,并转换成ANNOVAR的文件形式。
一个小讨论
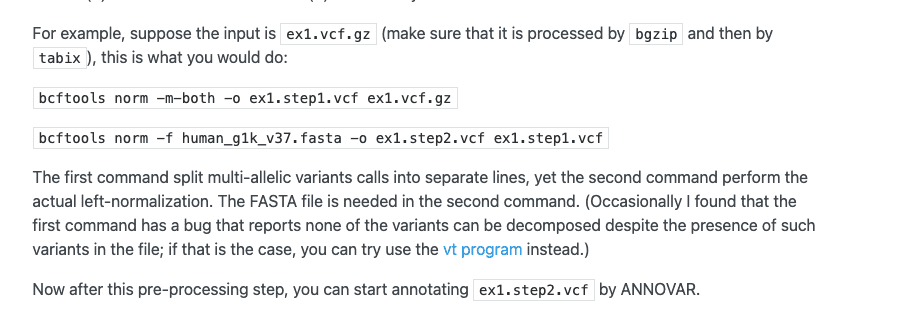
ANNOVAR在进行VCF注释之前,需要先对VCF文件进行split以及left-normalization(详见VCF Processing Guide),因为ANNOVAR的注释文件,都是left-normalization的。
那么Clinvar的VCF文件,是否需要进行split和left-normalization,然后再转换成ANNOVAR的注释文件?这个问题David Baux也提到了。

我对Clinvar的VCF文件进行了测试,发现它已经是split和left-normalization的了。由此验证了我以前看过某篇博客,上面说Clinvar的突变描述格式,在基因组注释,是left-normalization,而在cDNA注释和氨基酸注释上,则遵循HGVS的标准。这或许能作为我们处理突变描述格式时的一个参考。 截止该篇博客发布,这个repo已经运行了将近一个月,目前已经较为稳定,欢迎大家使用。